Under-Canopy Lighting Installation: 2026 Checklist & Guide
Under-Canopy Lighting Installation guide: 8–12 in height, 18–24 in spacing, day 14–21 start, 40–50% ramp. Plan HVAC and power—learn more.
TL;DR
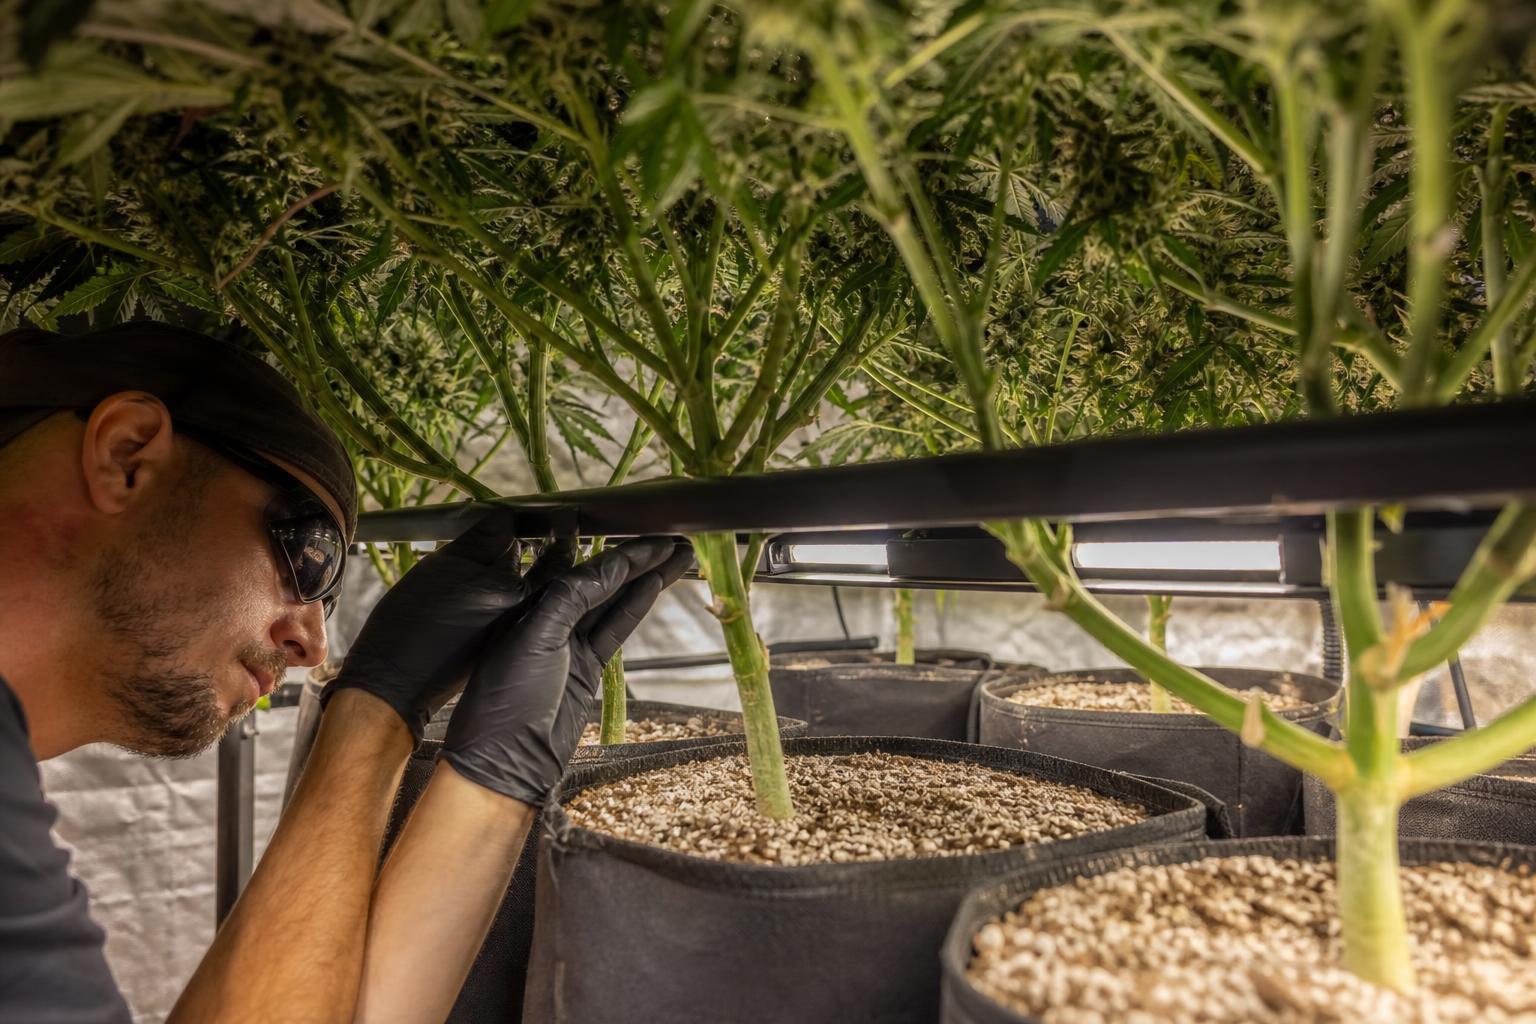
Under-canopy lighting installation involves mounting supplemental LED bars below the plant canopy, facing upward, to deliver light to bud sites and foliage that top lights can’t reach. Proper installation requires fixtures placed 8 to 12 inches above the substrate with 18 to 24 inches between bars, activation around days 14 to 21 of flower, and a gradual ramp-up from 40 to 50% intensity. Pre-installation planning around electrical capacity, HVAC load, and IPM schedules is just as important as the lights themselves.
What Is Under-Canopy Lighting Installation?
Under-canopy lighting installation is the process of placing supplemental LED fixtures below the main plant canopy in a controlled environment agriculture (CEA) setting. The fixtures mount on low-profile stands or horizontal bars at the base of the plant, with LEDs facing upward. Their job is simple: deliver photosynthetically active radiation (PAR) to the lower bud sites and leaf surfaces that overhead lights cannot reach because the upper canopy absorbs or blocks 80 to 90% of the light before it gets there.
This technique applies across cannabis flower rooms, greenhouses growing vine crops, and certain vertical farming configurations. The core problem it solves is universal: dense canopies starve lower growth of the light energy needed to produce quality yield.
How Do You Install Under-Canopy Lighting?
Under-canopy lighting installation involves mounting supplemental LED fixtures beneath the plant canopy, positioning the lights to illuminate lower foliage and shaded growing areas. The process includes assessing canopy dimensions, planning fixture spacing, checking electrical capacity, installing moisture-protected mounting and wiring systems, and measuring PPFD after installation. For commercial growing environments, fixture placement and intensity should be adjusted according to crop requirements, canopy density, manufacturer specifications, and measured light distribution.
If you’re evaluating whether your facility is a fit, explore under-canopy lighting solutions and how they integrate with existing top-light setups.
UCL vs. Interlighting vs. Top Lighting
These three terms get used interchangeably, but they describe different things.
Lighting Type | Position | Direction | Target Zone |
|---|---|---|---|
Top lighting | Above canopy | Downward | Upper canopy and overall DLI |
Interlighting | Mid-canopy, within foliage | Horizontal or angled | Middle canopy zone |
Under-canopy lighting | Below canopy, near substrate | Upward | Lowest bud sites and underside of mid-canopy leaves |
The distinction matters for installation. Under-canopy fixtures sit completely below the foliage line and fire upward, which means different mounting hardware, different PPFD targets, and different clearance requirements than interlighting systems placed inside the canopy. Research on tomatoes and other greenhouse crops confirms that intra-canopy lighting increased total light absorption by 8% compared to top lighting alone, with combined approaches yielding a 4% boost, demonstrating that supplemental light at lower canopy levels captures energy that would otherwise be wasted.
Why Under-Canopy Lighting Installation Matters
The economics are straightforward. Lower-canopy bud sites that receive inadequate light produce small, airy, low-grade flower. In commercial cannabis, this material either gets sorted into a lower price tier or processed into extract at a fraction of top-shelf value. In greenhouse produce, shaded fruit develops more slowly and with less uniformity.
Research consistently supports 20 to 25% increases in flower mass from under-canopy supplemental lighting in cannabis. The benefits extend well beyond cannabis: peer-reviewed studies have documented improved growth, flowering, fruiting, yields, and quality in blackberry, tomato, bush bean, cucumber, and sweet pepper when sub-canopy or inter-canopy lighting was added.
A May 2025 study on medicinal cannabis found that adding supplemental light to inner canopies enhances profitability, resulting in higher yields, improved energy efficiency, and more standardized products. The evidence for under-canopy lighting is no longer experimental; it’s operational.
Industry adoption reflects this. Sixty-five percent of commercial growers considering new lighting in the next 12 months want to explore ways to augment top lighting with side, intercanopy, or sub-canopy fixtures, a figure that grew 10 percentage points from 2023.
What Practitioners Report
Grower forums provide a useful ground-truth check against research claims. On Overgrow.com, one grower with over 1,600 replies on the topic reported that under-canopy lighting “turns B bud into A bud,” while noting it took some adjustment because certain cultivars demanded more nutrients and water under the added light. A grower on UK420 reported that lower buds came in dense and heavy with next to no airy structures, and the weight difference between plants near the supplemental light versus those further away was, in their words, “HUGE.”
On the Phenohunter forum, a practitioner shared that a colleague running a multi-room commercial operation set up one room with under-canopy lighting and far-red supplementation. That room consistently produced more weight and finished about a week sooner than the identical rooms without it.
These reports line up with what published research on yield gains confirms.
Installation Specifications
Getting the physical installation right determines whether your under-canopy lighting investment pays off or creates problems. Here are the numbers that matter.
Mounting Height and Bar Spacing
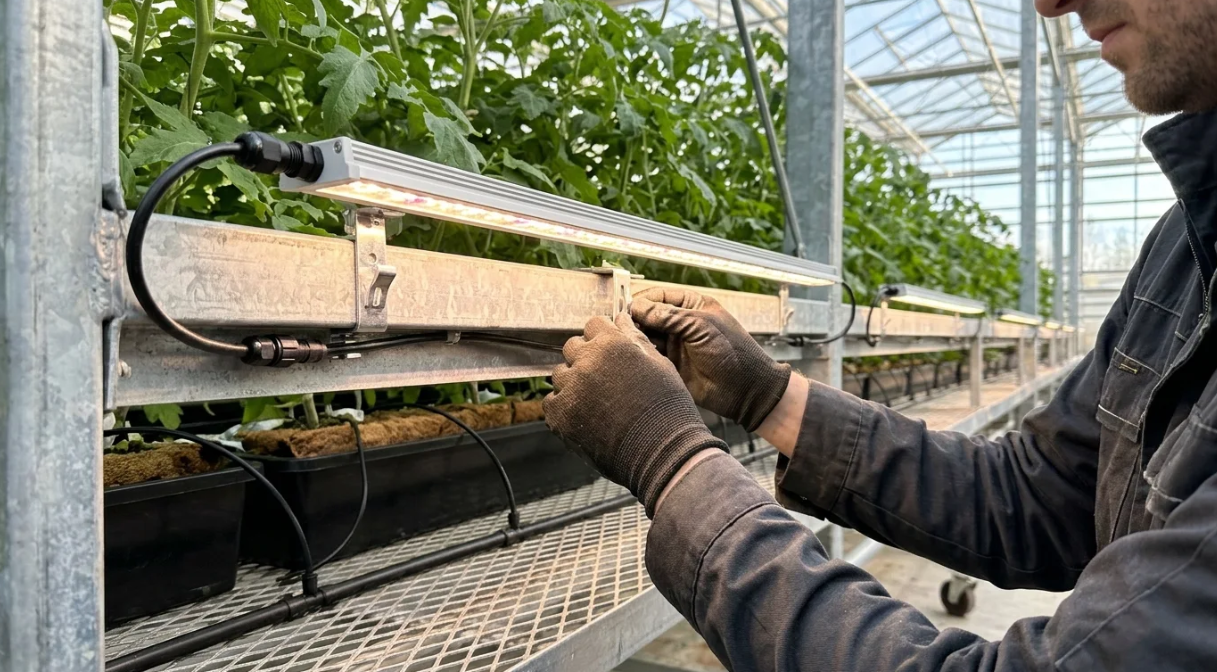
Position under-canopy light bars approximately 8 to 12 inches above the substrate or pot base, pointing upward. This height prevents heat stress on roots and growing media while delivering meaningful PPFD to lower leaves and bud sites. The bars should sit below the lowest significant foliage, not buried within the canopy.
For bar spacing along a row, 18 to 24 inches between bars provides even coverage without creating hotspots.
Maintain a minimum of 3 inches (7.5 cm) clearance between the light surface and any plant tissue. Buds or leaves closer than this threshold will experience light stress damage.
Fixture Wattage
Commercial under-canopy bars typically range from 60 to 160 watts, with 120W being a common sweet spot for cannabis flower rooms. The Boost XE under-canopy bar runs at 120W and is designed to be OptiDrive-ready, meaning it operates without an onboard driver for a lighter, slimmer profile.
PPFD Targets by Growth Stage
Growth Stage | Recommended PPFD (µmol/m²/s) |
|---|---|
Early flower | 100 to 150 |
Mid flower | 150 to 250 |
Late flower | 200 to 300 |
These targets are supplemental, meaning they represent the PPFD contribution from the under-canopy fixtures alone. They don’t replace your top-light DLI and PPFD targets, which remain the primary driver of overall canopy productivity.
Orientation
Mount bars horizontally, parallel to benches or rows, with LEDs facing straight up. This orientation maximizes coverage of the lower canopy and keeps the fixture profile low enough for worker access.
How to Calculate Under-Canopy Light Fixture Quantity
The number of under-canopy LED fixtures required depends on the growing area's dimensions, bench configuration, canopy density, fixture output, and manufacturer's recommended coverage area.
Rather than selecting fixtures based on wattage alone, calculate the required quantity using the actual installation layout and verify coverage with PPFD measurements.
Basic Fixture Quantity Formula
Use this preliminary formula to estimate the number of fixtures required:
Number of fixtures = Total installation area ÷ Effective coverage area per fixture
For example, if a growing area measures 1,000 square feet and each fixture is designed to cover 20 square feet under the intended mounting conditions:
1,000 ÷ 20 = 50 fixtures.
This is an initial planning estimate, not a final engineering specification. Actual fixture requirements depend on the light distribution pattern, mounting height, spacing, and target PPFD.
Example Under-Canopy Lighting Layout
Installation factor | Example specification |
|---|---|
Growing area | 1,000 sq. ft. |
Fixture wattage | 120W |
Assumed coverage per fixture | 20 sq. ft. |
Estimated fixture quantity | 50 |
Total connected load | 6,000W |
Estimated operating power | 6 kW |
The example assumes every fixture operates at its rated 120W. Actual power consumption may be lower when fixtures are dimmed.
What Determines Fixture Spacing?
Fixture spacing should be based on the manufacturer's photometric data and the required light distribution at canopy level.
Consider these factors:
Mounting height: Changes the illuminated footprint and light intensity.
Beam distribution: Determines how widely light spreads across the lower canopy.
Fixture output: Higher-output fixtures may illuminate a larger area, depending on optics and placement.
Canopy density: Dense foliage can create uneven light distribution and additional shading.
Overlap: Appropriate overlap helps reduce dark areas, but excessive overlap can create localized high-intensity zones.
For commercial installations, request fixture photometric data and validate the proposed layout with actual PPFD measurements before finalizing the installation.
How to Measure PPFD After Under-Canopy Lighting Installation
Measuring photosynthetic photon flux density (PPFD) after installation helps determine whether supplemental lighting reaches the intended canopy areas. A properly commissioned system should provide reasonably consistent light distribution without creating localized hotspots or leaving significant dark zones.
Use a Quantum PAR Sensor
A quantum sensor measures photosynthetic photon flux density in micromoles per square meter per second (µmol/m²/s).
For under-canopy installations, measurements should be taken at representative lower-canopy positions rather than relying exclusively on readings from above the plants.
Record measurements at multiple locations, including:
Directly above each fixture.
Between adjacent fixtures.
Near the edges of the illuminated area.
At representative lower-canopy leaf and bud positions.
At different heights within the target canopy zone.
Create a PPFD Measurement Grid
A measurement grid helps identify uneven light distribution across the growing area.
Measurement location | What to evaluate |
|---|---|
Directly above fixture | Peak supplemental intensity |
Between fixtures | Light uniformity and potential gaps |
Outer fixture edges | Coverage limitations |
Lower canopy center | Light reaching the intended target zone |
Different canopy heights | Vertical light distribution |
Take measurements under consistent operating conditions. Record overhead lighting and under-canopy lighting separately when possible so the contribution of each system can be evaluated.
Compare Measurements Against the Lighting Plan
Compare the measured PPFD distribution against the target established during system design.
If some locations receive substantially more light than others, adjust fixture spacing, mounting positions, orientation, or dimming levels as appropriate.
Repeat measurements after major canopy changes, fixture adjustments, or changes to the lighting program.
Calculate Supplemental DLI
Daily Light Integral (DLI) estimates the total photosynthetically active light received over a day.
For a constant supplemental PPFD:
DLI = PPFD × Lighting hours × 3,600 ÷ 1,000,000
For example, a supplemental PPFD of 150 µmol/m²/s operating for 12 hours provides:
150 × 12 × 3,600 ÷ 1,000,000 = 6.48 mol/m²/day.
For variable or dimmed lighting schedules, calculate DLI using the actual PPFD over each operating period.
Remember that supplemental DLI is an additional contribution to the light received from overhead fixtures and natural sunlight. It should be evaluated alongside total canopy DLI and the crop's requirements.
Pre-Installation Checklist
Most under-canopy lighting installation failures happen before the lights are ever turned on. The readiness work is where projects succeed or stall.
Electrical Capacity
If your facility is already at or near maximum electrical load, adding new light circuits could trip breakers or force unsafe wiring modifications. Have a licensed electrician audit your panel capacity and available circuits before ordering fixtures. This step is non-negotiable. For a deeper look at how lighting fits into your facility’s electrical design, review this guide to greenhouse electrical infrastructure.
HVAC and Dehumidification
More light means more heat. A full, actively photosynthesizing canopy also transpires more water. You need to verify that your cooling and dehumidification systems have headroom before installation, not after. An LED driver running a 1,000W system at 95% efficiency still sheds 50W of heat per driver. Scale that across a facility with hundreds of drivers and the thermal load adds up quickly, sometimes exceeding 255,000 BTU per hour in larger deployments.
Understanding how much HVAC capacity your LED lights require prevents costly surprises.
Moisture-Safe Wiring
Grow rooms are humid. Electrical connections must be adequately sealed to prevent moisture infiltration that could lead to shorts or fixture failure. Use waterproof connectors and route cabling through sealed conduit. Running extension cords haphazardly through the canopy is a fire hazard and an operational liability.
Fixture Compatibility and Environmental Ratings
Before purchasing under-canopy LED fixtures, confirm that their electrical and environmental specifications match the growing facility.
Review the following:
Fixture input voltage and frequency.
Maximum operating current.
Dimming and control compatibility.
Maximum daisy-chain configuration.
Ingress Protection (IP) rating.
Operating temperature and humidity limits.
Approved mounting hardware and connector types.
Warranty and maintenance requirements.
An appropriate IP rating should be selected based on the actual moisture exposure and cleaning procedures within the facility. An IP rating alone does not guarantee suitability for every wet or washdown environment.
Electrical Inspection and Code Compliance
Under-canopy lighting must be installed in accordance with applicable electrical codes and manufacturer requirements.
Have a qualified electrician verify circuit capacity, conductor sizing, grounding, overcurrent protection, equipment ratings, and protection against moisture exposure.
Complete the required inspections and electrical testing before operating the fixtures. Do not rely on extension cords, improvised splices, or unapproved connectors as permanent installation solutions.
IPM Schedule Coordination
Under-canopy fixtures sit directly in the spray zone during foliar applications. Turn them off before any spray event, allow the canopy to dry completely, and then resume. This protects the fixtures and reduces the humidity spike that follows a spray.
Labor Access
Lights placed too low become obstructions for pruning, defoliation, irrigation maintenance, and harvest. Plan the fixture layout so workers can still move through and access plants without damaging equipment or themselves.
Nutrient and Irrigation Adjustment
This is the one practitioners consistently flag. More light drives more photosynthesis, which increases water and nutrient demand. One grower on Overgrow.com put it plainly: some cultivars “want more nutes and water, some just want more water.” Failing to adjust nutrient strategies alongside LED upgrades is a common cause of deficiency symptoms after installation.
Not sure your facility is ready? Schedule a free consultation with a lighting specialist to review your setup.
How to Install Under-Canopy LED Lighting: Step-by-Step
Installing under-canopy LED lighting requires more than positioning fixtures beneath plants. Commercial growers must plan mounting locations, verify electrical capacity, protect connections from moisture, and test light distribution before operating the system at full output.
Follow these steps when planning an under-canopy lighting installation.
Step 1: Assess the Existing Canopy
Begin by measuring the growing area, including bench dimensions, plant spacing, canopy depth, and available clearance beneath the foliage.
Use a quantum PAR sensor to measure existing PPFD at multiple points throughout the lower canopy. Record the measurements to identify areas receiving insufficient light from overhead fixtures.
The assessment should also account for irrigation lines, drainage systems, worker access, and equipment that could interfere with fixture placement.
Step 2: Create a Fixture Layout
Map the proposed fixture positions before installing mounting hardware. Determine the number of LED bars required based on the growing area's dimensions, fixture coverage specifications, and the target light distribution.
Keep fixtures positioned so they illuminate the intended lower-canopy zones without creating excessive overlap or obstructing maintenance access.
Follow the manufacturer's mounting instructions for spacing, orientation, and minimum clearance.
Step 3: Verify Electrical Requirements
Calculate the total connected wattage of the proposed fixtures and check the available electrical capacity.
Confirm circuit ratings, conductor sizing, overcurrent protection, grounding, connector compatibility, and maximum daisy-chain limits with a qualified electrician.
For facilities using remote-driver systems, confirm cable lengths, driver locations, and compatibility with the selected fixtures and controls.
Step 4: Install Mounting Hardware
Install the manufacturer's approved brackets, mounting rails, or support structures beneath the canopy.
Secure each fixture so it remains stable during irrigation, pruning, harvesting, and routine maintenance.
Position the LED bars according to the manufacturer's specified mounting height and clearance requirements. Avoid placing fixtures where water can accumulate or where workers may accidentally strike them.
Step 5: Connect and Protect the Electrical System
Have a qualified electrician complete the electrical connections according to the fixture manufacturer's instructions and applicable electrical codes.
Use appropriately rated connectors, cables, enclosures, and protective devices for the environmental conditions.
Keep electrical connections away from direct spray, standing water, and areas where routine maintenance could damage wiring.
Step 6: Test Fixture Operation
Before introducing the system into normal operation, inspect the mounting hardware, cable routing, electrical connections, and fixture condition.
Have the electrician perform the required electrical safety and functional checks. Confirm that all fixtures operate correctly and that dimming and control functions work as intended.
Step 7: Measure PPFD and Adjust Placement
Turn on the system and use a quantum PAR sensor to measure PPFD at representative lower-canopy positions.
Compare the measured distribution against the crop's supplemental lighting requirements. Identify areas with uneven coverage, excessive intensity, or insufficient light.
Adjust fixture positioning or dimming settings according to the measurements and manufacturer recommendations.
Step 8: Document the Installation
Record fixture locations, model numbers, connected wattage, circuit assignments, control settings, and PPFD measurements.
Keep the installation records available for maintenance teams and future lighting adjustments.
A documented commissioning process makes it easier to identify performance changes, troubleshoot equipment, and compare results across growing cycles.
When to Activate and How to Ramp Up
Activation Timing
The standard recommendation is to activate under-canopy lighting in early to mid flower, typically around days 14 to 21 after the flip to 12/12 in cannabis. By day 14, bud sites are set and the plant is actively building flower structure, so supplemental PAR at the lower canopy has the highest impact.
Running under-canopy lights during vegetation or very early flower rarely provides strong ROI. A grower on THCFarmer captured the common confusion: “I’ve been thinking about adding under-canopy lights to help ripen lower buds. I don’t know if the lights would help during vegetation, though.” The answer is that they won’t, at least not enough to justify the energy cost. Save them for flower.
Some cultivators use a staggered approach: activating around day 16 at low intensity and then adjusting at day 19 to 21. This balances energy use with IPM schedules and lets you observe the plants’ response.
Ramp-Up Protocol
Start at 40 to 50% output when you first introduce under-canopy lighting. Gradually increase intensity over 2 to 3 weeks to allow plants to adapt without light stress. Jumping straight to full power risks bleaching lower leaves that have acclimated to low-light conditions.
For detailed placement guidance during ramp-up, this under-canopy light placement guide covers positioning adjustments by stage.
Electrical and Infrastructure Considerations
Daisy-Chain Capability and Circuit Limits
Most commercial under-canopy bars support daisy-chaining, which simplifies wiring by connecting multiple fixtures in series from a single home run. Check the manufacturer’s specifications for the maximum number of fixtures per chain and the total wattage per circuit. Exceeding either limit degrades performance or creates safety issues.
How to Calculate Under-Canopy Lighting Electrical Load
Before installing supplemental LED fixtures, calculate the total connected load to determine whether existing circuits and electrical infrastructure can support the additional equipment.
Use this formula:
Total connected load (W) = Number of fixtures × Fixture wattage
For example, a system with 50 under-canopy LED bars rated at 120W each has a total connected load of:
50 × 120W = 6,000W, or 6 kW.
Example Electrical Load by Fixture Quantity
Number of fixtures | Wattage per fixture | Total connected load |
|---|---|---|
10 | 120W | 1,200W |
20 | 120W | 2,400W |
30 | 120W | 3,600W |
40 | 120W | 4,800W |
50 | 120W | 6,000W |
100 | 120W | 12,000W |
These figures represent connected lighting load, not a circuit-sizing recommendation.
Actual electrical design must account for supply voltage, current, power factor, applicable continuous-load requirements, circuit protection, conductor ampacity, and manufacturer specifications.
Have a qualified electrician determine the appropriate number of circuits and verify that the installation complies with applicable electrical codes.
The Case for Centralized Power Architecture
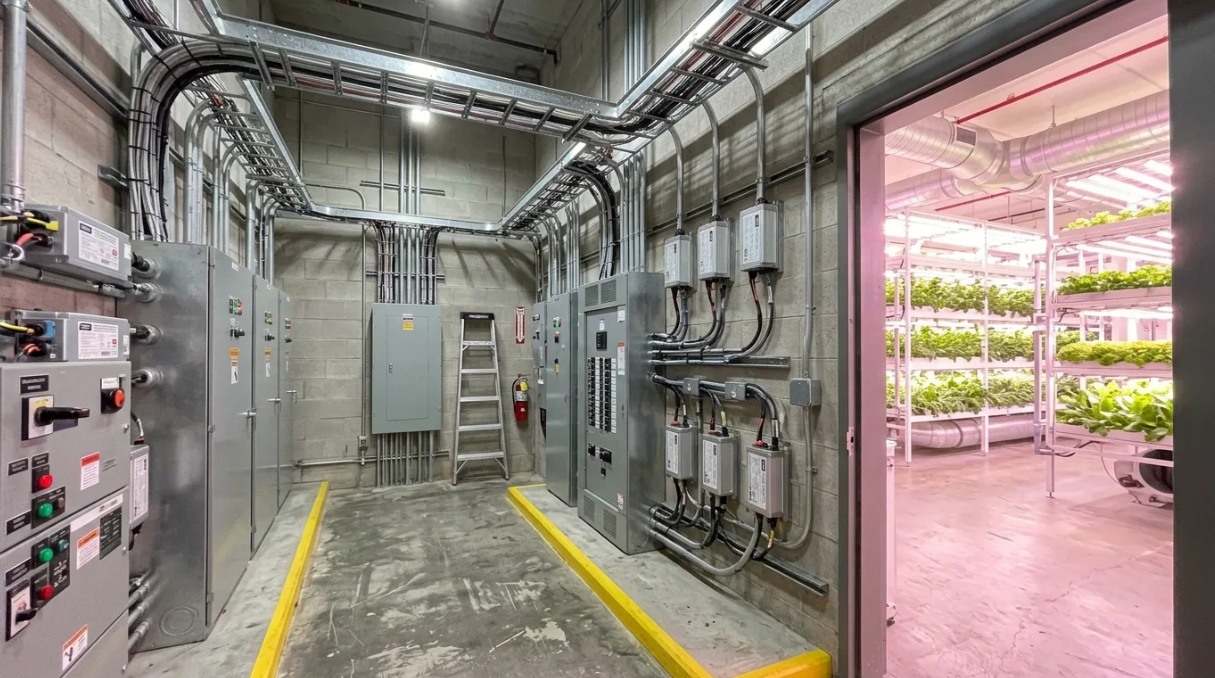
One significant trend in commercial cultivation is relocating LED drivers from grow spaces to a centralized control area. The logic is practical: drivers generate heat, contain capacitors and other components prone to failure in warm and humid environments, and create hundreds or thousands of potential failure points distributed throughout the facility.
By moving drivers to a dry, climate-controlled electrical room, you reduce in-room heat (which lowers HVAC demand), simplify servicing, and make the grow-space fixtures lighter and easier to install. This is particularly relevant for under-canopy lighting installation because fixtures in the lower canopy zone are exposed to the highest humidity levels and the most difficult access for maintenance.
The OptiDrive remote power system is built around this principle, moving the entire driver layer outside the grow space. It works with OptiDrive-ready fixtures across the lineup, changing the installation economics for facilities running hundreds of under-canopy bars.
Utility Rebates
DLC-listed LED fixtures qualify for utility rebate programs in many North American jurisdictions. These rebates can offset a meaningful portion of the upfront cost for an under-canopy lighting installation project. Check available rebate programs early in your planning process, because eligibility often depends on purchasing DLC-qualified products.
Under-Canopy Lighting Installation Cost and ROI
The cost of under-canopy lighting installation depends on the number of fixtures, fixture wattage, mounting hardware, electrical infrastructure, labor, and control requirements.
For commercial growing facilities, the total investment should include both equipment and installation expenses.
What Affects Under-Canopy Lighting Installation Cost?
Cost component | What it includes |
|---|---|
LED fixtures | Under-canopy light bars and accessories |
Mounting hardware | Brackets, rails, supports, and fasteners |
Electrical installation | Wiring, conduit, connectors, and circuit modifications |
Power architecture | Drivers, remote power systems, and distribution equipment |
Controls | Dimming, scheduling, and lighting management |
Labor | Installation, electrical work, testing, and commissioning |
Infrastructure | Potential HVAC and dehumidification upgrades |
Calculate Under-Canopy Lighting Energy Consumption
Use the following formula:
Daily electricity consumption (kWh) = Total connected load (kW) × Operating hours
For example, a 6 kW under-canopy lighting system operating for 12 hours per day consumes:
6 kW × 12 hours = 72 kWh per day.
To estimate monthly electricity consumption:
72 kWh × 30 days = 2,160 kWh per month.
Estimate Monthly Electricity Cost
Multiply monthly electricity consumption by your electricity tariff.
Monthly electricity cost = Monthly energy consumption × Electricity rate
For example, at an illustrative electricity rate of $0.15 per kWh:
2,160 × $0.15 = $324 per month.
Actual operating costs depend on local electricity rates, dimming levels, operating schedules, and system efficiency.
How to Evaluate Under-Canopy Lighting ROI
The financial return depends on whether additional marketable production and improved product consistency generate enough value to offset equipment, installation, electricity, and maintenance expenses.
Use this basic calculation:
Net operating benefit = Additional product revenue − Additional operating costs
ROI (%) = (Annual net benefit ÷ Initial installation investment) × 100
Include the following when estimating financial performance:
Additional marketable yield rather than total biomass alone.
Changes in product grade and selling price.
Additional electricity consumption.
Cooling and dehumidification costs.
Maintenance and replacement expenses.
Installation and equipment investment.
A pilot installation can help establish realistic production and energy figures before deploying under-canopy lighting throughout an entire facility.
When Is Under-Canopy Lighting Installation Warranted?
Not every facility needs it. Before committing, measure and evaluate:
Lower canopy PPFD: If the lower canopy receives less than 10% of top PPFD at node height (use a quantum sensor), supplemental lighting has a strong case.
Canopy depth: If the distance from the top light to the lowest bud site exceeds 18 inches, light penetration is almost certainly insufficient.
Lower-bud DLI: If DLI at lower bud sites falls below 20 mol/m²/day during flower, those sites are underperforming.
Sort labor and grade mix: If a significant percentage of your harvest is lower-grade material that requires sorting or gets downgraded to extract, under-canopy lighting directly addresses that revenue gap.
If two or more of these conditions apply, the installation is likely to pay for itself within one to two harvest cycles.
How to Choose the Right Under-Canopy LED Light Spectrum
Selecting an under-canopy LED fixture requires evaluating its spectral output, photon distribution, energy efficiency, crop requirements, and operating environment.
Full-spectrum white and red-heavy LED fixtures serve different lighting strategies. Neither option is automatically superior for every crop or installation.
Full-Spectrum White vs. Red-Heavy LED Fixtures
Comparison factor | Full-spectrum white LED | Red-heavy LED |
|---|---|---|
Spectral output | Broad visible spectrum | Greater emphasis on red wavelengths |
Photosynthetic contribution | Supports photosynthesis across multiple wavelengths | Provides substantial red-light output |
Visual inspection | Generally provides better natural color rendering | May distort plant appearance |
Application | General supplemental lighting | Targeted spectral supplementation |
Selection priority | Broad-spectrum performance | Crop-specific spectral strategy |
What Should You Evaluate Before Purchasing?
1. Spectral distribution
Review the fixture's spectral power distribution rather than relying on labels such as full-spectrum or red-heavy.
2. Photon output
Compare photosynthetic photon flux (PPF), photosynthetic photon efficacy (PPE), and the expected PPFD distribution at the intended mounting distance.
3. Light distribution
Consider the fixture's optical design and illuminated footprint. A fixture with high output may still produce uneven coverage if its distribution does not match the growing area.
4. Environmental suitability
Check the fixture's environmental protection rating, connector specifications, operating temperature limits, and manufacturer installation requirements.
5. Control compatibility
Confirm whether the fixture supports the dimming, scheduling, and power architecture used by the facility.
The best under-canopy LED fixture is the one that delivers the required light distribution and crop performance while fitting the facility's electrical, environmental, and operational requirements.
Common Installation Mistakes
Installing too early in the cycle. Running under-canopy lights during vegetation or the first two weeks of flower wastes energy without meaningful yield impact.
Ignoring the microclimate. Extra light below the canopy generates additional heat and humidity in a zone that already has poor airflow. Ensure fans and ventilation reach the lower canopy.
Skipping nutrient adjustment. More light means more photosynthesis, which means more water and nutrient uptake. Failing to increase fertigation leads to deficiencies.
Overlapping light zones. Clustering bars too closely creates hotspots that stress tissue rather than helping it. Stick to the 18 to 24 inch spacing guideline.
Unsafe wiring. Loose connections, unprotected splices, and cords draped through wet foliage are fire and shock hazards. Every connection should be waterproof and properly routed.
For an expanded breakdown of these pitfalls, see the full guide on under-canopy lighting mistakes and how to avoid them.
Frequently Asked Questions
When should I turn on under-canopy lights during the grow cycle?
Activate them around days 14 to 21 after flipping to flower in cannabis. By this point, bud sites are established and the plant is actively building flower structure. Running them during vegetation provides minimal benefit relative to the energy cost.
How far should under-canopy lights be from the plant?
Mount the bars 8 to 12 inches above the substrate, and maintain at least 3 inches of clearance between the light surface and the nearest plant tissue. Closer than 3 inches risks light stress and tissue damage.
How much yield improvement can I expect from under-canopy lighting installation?
Research and commercial grower reports consistently cite 20 to 25% increases in flower mass. The actual number depends on canopy density, cultivar, and how well you adjust nutrients and irrigation to match the increased light.
Do I need to upgrade my HVAC system before installing?
Possibly. Every watt of lighting adds heat to the grow space, and increased photosynthesis raises transpiration rates. Audit your cooling and dehumidification capacity before adding circuits. If you’re already running near capacity, an HVAC upgrade should happen first.
Does under-canopy lighting work for crops other than cannabis?
Yes. Peer-reviewed research has documented yield and quality improvements in tomatoes, cucumbers, sweet peppers, bush beans, blackberries, and other horticultural crops when sub-canopy or inter-canopy lighting was applied.
What wattage should I use for commercial under-canopy bars?
Commercial fixtures typically range from 60 to 160 watts. A 120W bar is a common choice for cannabis flower rooms, balancing light output with manageable heat generation and energy cost.
Should I dim the lights when I first install them?
Yes. Start at 40 to 50% output and increase gradually over 2 to 3 weeks. Lower leaves have adapted to shade conditions, and a sudden jump to full intensity can cause bleaching or stress.
How does centralized power architecture affect under-canopy lighting installation?
Moving LED drivers out of the grow space and into a centralized electrical room reduces in-room heat, eliminates fixture-level failure points in the humid lower canopy zone, and simplifies wiring. It changes the maintenance and reliability math significantly for large-scale deployments.
How many under-canopy LED lights do I need?
The number of under-canopy LED fixtures depends on the growing area's dimensions, fixture output, mounting height, and recommended coverage area. Start with the manufacturer's photometric specifications, create a fixture layout, and verify the final arrangement using PPFD measurements.
How do you measure PPFD for under-canopy lighting?
Use a quantum PAR sensor to measure photosynthetic photon flux density at representative lower-canopy positions. Take readings directly above fixtures, between fixtures, and around the edges of the illuminated area to evaluate coverage and identify uneven light distribution.
Can under-canopy LED lights be daisy-chained?
Some commercial under-canopy LED fixtures support daisy-chaining, allowing multiple lights to connect through a shared power arrangement. However, the maximum fixture count depends on the manufacturer's specifications, circuit capacity, connector ratings, and electrical design.
Does under-canopy lighting increase electricity costs?
Yes. Under-canopy fixtures add to the facility's total lighting load. Electricity consumption depends on fixture wattage, operating hours, dimming levels, and the number of installed units. Calculate the additional kWh consumption and compare it with any increase in marketable production.
What should be checked after installing under-canopy lights?
After installation, inspect mounting hardware, electrical connections, grounding, cable routing, and fixture operation. Verify dimming and control functions, then measure PPFD across the lower canopy to confirm that light distribution matches the installation plan. Document the results for future maintenance and adjustments.
Ready to plan your under-canopy lighting installation? Talk to a lighting specialist about your facility’s layout, electrical capacity, and crop goals.